앞서 전통적인 방법인 JDBC 드라이버로 간단히 DB연결 테스트를 해봤다.
https://standout.tistory.com/1109
JDBC 드라이버: 간단히 DB 연결테스트하기
간단히 JDBC DB연결테스트를 해보자. pom.xml에 jdbc 라이브러리를 추가하고, Controller class에 JDBC 드라이버를 로드해 테스트한다. org.mariadb.jdbc mariadb-java-client 3.1.4 // JDBC 드라이버 로드 Class.forName("org.ma
standout.tistory.com
이번에는 Spring의 JdbcTemplate을 사용하여 연결을 시도해보자.
pom.xml에 Spring Core 및 JDBC 의존성을 추가하고, mariadb-java-client를 추가해주자.
<!-- Spring Core 및 JDBC 의존성 추가 -->
		<dependency>
			<groupId>org.springframework</groupId>
			<artifactId>spring-core</artifactId>
			<version>${org.springframework-version}</version>
		</dependency>
		<dependency>
			<groupId>org.springframework</groupId>
			<artifactId>spring-jdbc</artifactId>
			<version>${org.springframework-version}</version>
		</dependency>

		<!-- https://mvnrepository.com/artifact/org.mariadb.jdbc/mariadb-java-client -->
		<dependency>
			<groupId>org.mariadb.jdbc</groupId>
			<artifactId>mariadb-java-client</artifactId>
			<version>3.1.4</version>
		</dependency>
더보기
<project xmlns="http://maven.apache.org/POM/4.0.0"
	xmlns:xsi="http://www.w3.org/2001/XMLSchema-instance"
	xsi:schemaLocation="http://maven.apache.org/POM/4.0.0 https://maven.apache.org/xsd/maven-4.0.0.xsd">
	<modelVersion>4.0.0</modelVersion>
	<groupId>Board_hardCoding</groupId>
	<artifactId>Board_hardCoding</artifactId>
	<version>0.0.1-SNAPSHOT</version>
	<packaging>war</packaging>

	<properties>
		<!-- spring context, web, MVC는 세트로 같은 버전을 사용해야한다. -->
		<org.springframework-version>5.3.23</org.springframework-version>
	</properties>

	<!-- dependencies 위치 -->
	<dependencies>

		<!-- https://mvnrepository.com/artifact/org.springframework/spring-context -->
		<dependency>
			<groupId>org.springframework</groupId>
			<artifactId>spring-context</artifactId>
			<version>${org.springframework-version}</version>
		</dependency>
		<!-- https://mvnrepository.com/artifact/org.springframework/spring-web -->
		<dependency>
			<groupId>org.springframework</groupId>
			<artifactId>spring-web</artifactId>
			<version>${org.springframework-version}</version>
		</dependency>

		<!-- https://mvnrepository.com/artifact/org.springframework/spring-webmvc -->
		<dependency>
			<groupId>org.springframework</groupId>
			<artifactId>spring-webmvc</artifactId>
			<version>${org.springframework-version}</version>
		</dependency>

		<!-- Spring Core 및 JDBC 의존성 추가 -->
		<dependency>
			<groupId>org.springframework</groupId>
			<artifactId>spring-core</artifactId>
			<version>${org.springframework-version}</version>
		</dependency>
		<dependency>
			<groupId>org.springframework</groupId>
			<artifactId>spring-jdbc</artifactId>
			<version>${org.springframework-version}</version>
		</dependency>

		<!-- https://mvnrepository.com/artifact/org.mariadb.jdbc/mariadb-java-client -->
		<dependency>
			<groupId>org.mariadb.jdbc</groupId>
			<artifactId>mariadb-java-client</artifactId>
			<version>3.1.4</version>
		</dependency>

	</dependencies>

	<build>
		<sourceDirectory>src</sourceDirectory>
		<plugins>
			<plugin>
				<artifactId>maven-compiler-plugin</artifactId>
				<version>3.8.1</version>
				<configuration>
					<release>11</release>
				</configuration>
			</plugin>
			<plugin>
				<artifactId>maven-war-plugin</artifactId>
				<version>3.2.3</version>
				<configuration>
					<warSourceDirectory>WebContent</warSourceDirectory>
				</configuration>
			</plugin>
		</plugins>
	</build>
</project>
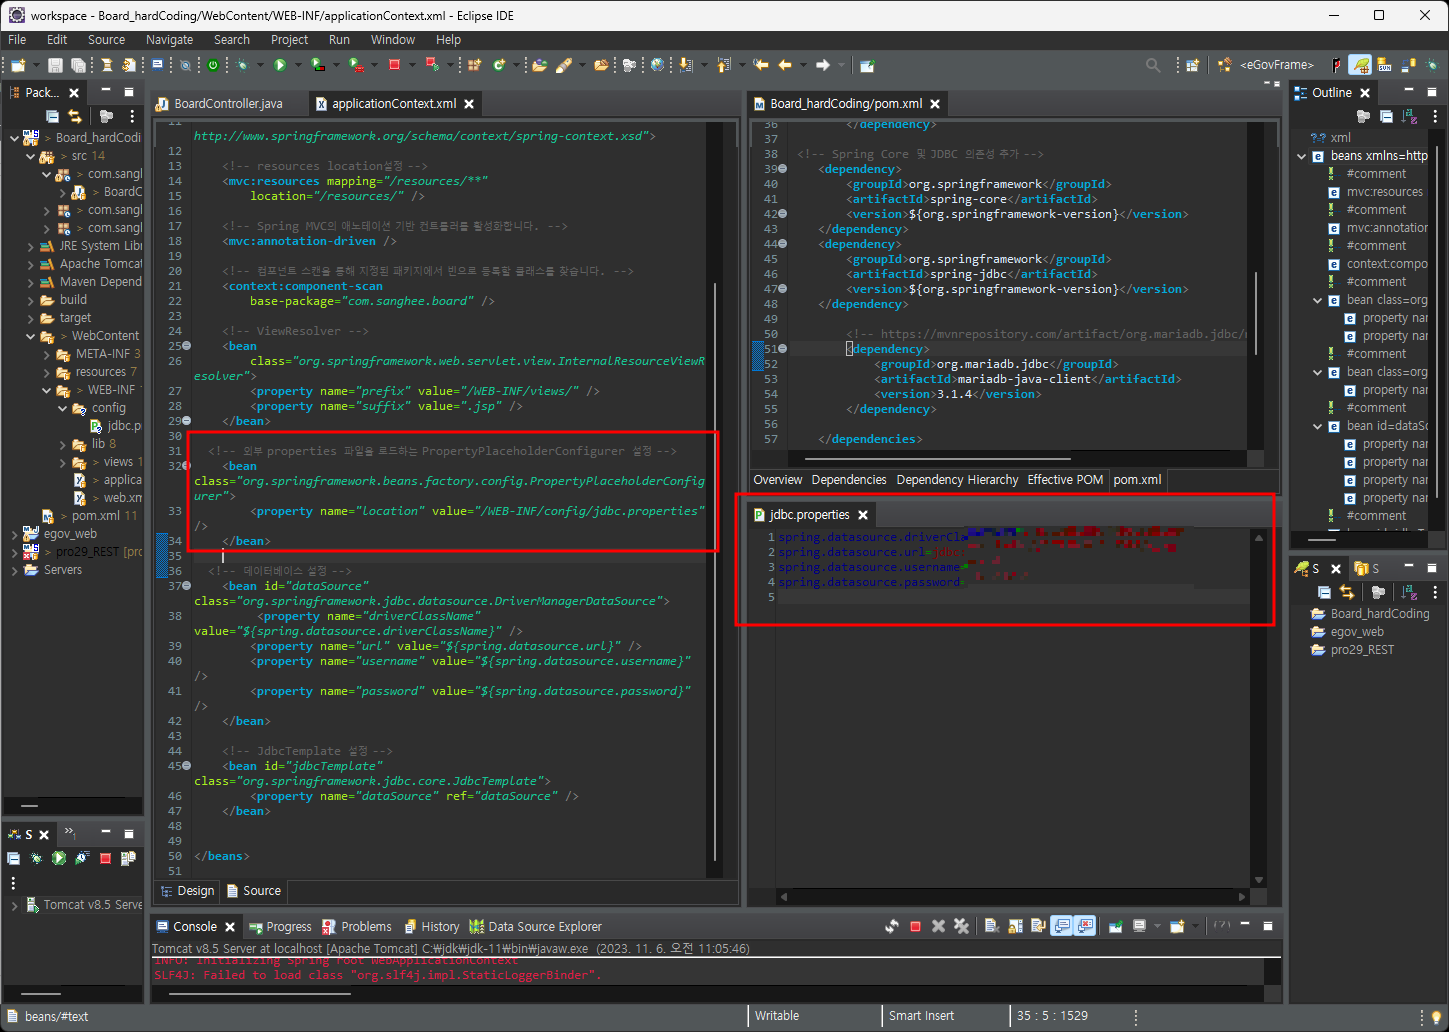
applicationContext.xml에 데이터베이스를 설정하고, jdbcTemplate도 함께 추가해보자.
이때 데이터베이스의 value는 아래와같이 변수화를해놓는이유는 보안상의 이유로 db정보를 따로 관리하고자함이다.
<!-- 데이터베이스 설정 -->
	<bean id="dataSource"
		class="org.springframework.jdbc.datasource.DriverManagerDataSource">
		<property name="driverClassName"
			value="${spring.datasource.driverClassName}" />
		<property name="url" value="${spring.datasource.url}" />
		<property name="username"
			value="${spring.datasource.username}" />
		<property name="password"
			value="${spring.datasource.password}" />
	</bean>

	<!-- JdbcTemplate 설정 -->
	<bean id="jdbcTemplate"
		class="org.springframework.jdbc.core.JdbcTemplate">
		<property name="dataSource" ref="dataSource" />
	</bean>
더보기
<?xml version="1.0" encoding="UTF-8"?>
<beans xmlns="http://www.springframework.org/schema/beans"
	xmlns:xsi="http://www.w3.org/2001/XMLSchema-instance"
	xmlns:mvc="http://www.springframework.org/schema/mvc"
	xmlns:context="http://www.springframework.org/schema/context"
	xsi:schemaLocation="http://www.springframework.org/schema/beans
                           http://www.springframework.org/schema/beans/spring-beans.xsd
                           http://www.springframework.org/schema/mvc
                           http://www.springframework.org/schema/mvc/spring-mvc.xsd
                           http://www.springframework.org/schema/context
                           http://www.springframework.org/schema/context/spring-context.xsd">

	<!-- resources location설정 -->
	<mvc:resources mapping="/resources/**"
		location="/resources/" />

	<!-- Spring MVC의 애노테이션 기반 컨트롤러를 활성화합니다. -->
	<mvc:annotation-driven />

	<!-- 컴포넌트 스캔을 통해 지정된 패키지에서 빈으로 등록할 클래스를 찾습니다. -->
	<context:component-scan
		base-package="com.sanghee.board" />

	<!-- ViewResolver -->
	<bean
		class="org.springframework.web.servlet.view.InternalResourceViewResolver">
		<property name="prefix" value="/WEB-INF/views/" />
		<property name="suffix" value=".jsp" />
	</bean>

	<!-- 외부 properties 파일을 로드하는 PropertyPlaceholderConfigurer 설정 -->
	<bean
		class="org.springframework.beans.factory.config.PropertyPlaceholderConfigurer">
		<property name="location"
			value="/WEB-INF/config/jdbc.properties" />
	</bean>

	<!-- 데이터베이스 설정 -->
	<bean id="dataSource"
		class="org.springframework.jdbc.datasource.DriverManagerDataSource">
		<property name="driverClassName"
			value="${spring.datasource.driverClassName}" />
		<property name="url" value="${spring.datasource.url}" />
		<property name="username"
			value="${spring.datasource.username}" />
		<property name="password"
			value="${spring.datasource.password}" />
	</bean>

	<!-- JdbcTemplate 설정 -->
	<bean id="jdbcTemplate"
		class="org.springframework.jdbc.core.JdbcTemplate">
		<property name="dataSource" ref="dataSource" />
	</bean>


</beans>
이제 원하는 경로에 properties파일을 만들어 db정보를 입력하고,
applicationContext.xml에 경로를 지정한다.
spring.datasource.driverClassName=org.mariadb.jdbc.Driver
spring.datasource.url=jdbc:mariadb://127.0.0.1:3307/db이름
spring.datasource.username=아이디
spring.datasource.password=비밀번호
<!-- 외부 properties 파일을 로드하는 PropertyPlaceholderConfigurer 설정 -->
<bean
class="org.springframework.beans.factory.config.PropertyPlaceholderConfigurer">
<property name="location"
value="/WEB-INF/config/jdbc.properties" />
</bean>
원하는 자바파일로 잠시 들어와서 jdbctemplate을 실행해 확인해보자.
	private final JdbcTemplate jdbcTemplate;

	@Autowired
	public BoardController(JdbcTemplate jdbcTemplate) {
		this.jdbcTemplate = jdbcTemplate;
	}
// Spring의 JdbcTemplate을 사용하여 연결을 시도하고, Spring이 예외 처리를 대신 수행하도록 하는 방법
try {
// 데이터베이스 연결 상태를 확인하기 위해 쿼리를 실행하지 않고도 연결을 체크할 수 있습니다.
jdbcTemplate.getDataSource().getConnection();
System.out.println("Database connection successful!");
} catch (Exception e) {
System.out.println("Database connection failed: " + e.getMessage());
}
완료
'JAVA > Spring' 카테고리의 다른 글
| Dynamic web project Spring MVC패턴: MVC패턴으로 화면에 값 띄우기 (0) | 2023.11.06 |
|---|---|
| MyBatis: 간단히 DB 연결테스트하기 (0) | 2023.11.06 |
| Dynamic web project Spring MVC패턴: Controller로 화면띄우기 (0) | 2023.11.01 |
| Annotation - @Builder (0) | 2023.06.25 |
| Annotation - @NoArgsConstructor (0) | 2023.06.25 |


